Showing posts with label podcasting. Show all posts

Wednesday, August 31, 2016

Podcasting redux redux

Podcastingpic

After something of a hiatus, my Cloudy Chat podcast is once again publishing. (iTunes feed. It’s also now on Google Play and available directly from my blog.) My regular co-host had moved onto new responsibilities at Red Hat and with a lot of travel and other things going on, I just let podcasting lapse. But I’ve got a new episode out with Red Hat’s Jen Krieger talking distributed teams, another one mostly in the can, and am partway through refreshing some of the standard audio and graphics associated with the podcast. I also expect to experiment with the format a bit going forward so you’ll likely see (well, hear) some approaches that differ from my standard 15-30 minute straight interview.

With this relaunch, I’ve gotten some questions from colleagues asking how I go about recording and editing podcasts. I’ve written on this topic before, but reading back, I see that I’ve made a fair number of changes to how I do things. So time for an update.

Let me note at this point that I use a number of different approaches depending upon the circumstances. 

I’ve written about how I record an interview with a remote guest previously and that description still pretty much applies except that I now generally use BlueJeans rather than Google+. But it really doesn’t matter; the process should be pretty much the same for most video conferencing systems. 

If I’m on the road, I try to minimize gear and use one of the iRig microphones plugged into my iPhone. If I recorded this way a lot, I might invest in a dedicated recorder. Note though that some of the high quality ones don’t work well as hand-held recorders because they’re overly sensitive to being handled while recording. (The TASCAM that I describe later on has this property; you have to mount it and/or use external microphones.)

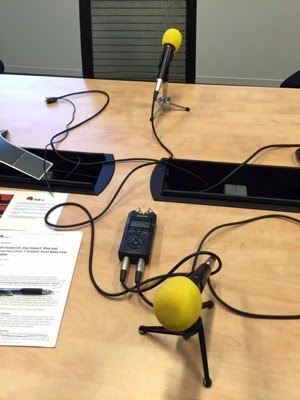
For this post, I’m going to describe how I record interviews when I’m in the office and don’t mind bringing in a (small) bag of recording gear. So this describes a case when your co-host(s) or guests are often in the same location as you are. I’ve fiddled with my kit over the past couple years and I’ve settled on this setup as one that is pretty straightforward once you have it down, can give excellent audio quality, and works to create a natural-feeling interview environment.

My hardware is as follows:

Setup the recorder for the external mics. I also use auto levels to try to balance the volume of the microphones but it doesn’t work as well as I would like. But, with my configuration, the mics record on different stereo channels so I can do some manipulation before I blend them. (I also have a USB sound mixing console that I can use to attach more microphones and to directly control their volumes but I’ve found, for most purposes, this adds a lot of complexity without a lot of benefit.)

For editing software, I use Audacity which is Free and Open Source and has far more features than I need or use. It also runs on Linux, Macs, and Windows.

Once I’ve blended the channels, the first thing I usually do when editing is go to Noise Removal under Effect, get a noise profile, and then apply noise removal to the entire recording. I think this capability was introduced in version 2 and, in my experience, does a great job of removing ventilation and other consistent background noises. Of course, the quieter an environment you can find, the better.

After editing in Audacity, I prepare the XML file that’s needed for iTunes and Google Play, splice my standard intro and outro audio onto the beginning and ends of the podcast, and upload the XML and the audio files to AWS. Most of the podcast apps get their feeds from the iTunes API these days, so that’s the one upload that really matters. Even with Google Play, you need to go through the steps to get your podcast into their store, but after that it can draw from the same XML file that iTunes uses. The only separate upload I do is to Soundcloud.

If it sounds kinda fiddly, it is. I’ve written a Python script [1] to take care of the splicing, the XML creation, and the AWS uploading. (Basically, I fill out a form with the title and description, point it at the MP3 file, and it does the rest. The only manual steps I still have to do are uploading to Soundcloud and writing a blog post for the episode; I also typically get my episodes transcribed by CastingWords for inclusion in the post.)

[1] It occurs to me that this is probably a good use case for Amazon Lambda but I wrote the original version of the script a few years ago and it generally works fine. 

Friday, February 13, 2015

Recording podcasts in-person 2015 edition

Podcastingpic

For my Cloudy Chat podcast series, I’ve been focusing lately on repeat guests drawn heavily from local Red Hat colleagues in Westford. I find it’s a great way to get interesting material out there without a whole lot of logistical overhead. Especially with all the activity going on with containers, docker, kubernetes, configuration management, and containerized operating systems like Project Atomic, there’s no shortage of things to cover without going too far afield.

I describe an earlier setup here. (See also how I use Google+ Hangouts for remote recording.) However, over time, I’ve experimented with some different setups for in-person recording to simplify the process while maintaining good quality. I’m pretty happy with where I’ve ended up—with the caveat that I’m always learning and tweaking things. 

For recordings in the office:

In my earlier post, I describe recording using a laptop and a USB microphone. I’ve also done recordings using a Peavey PV6 USB Mixing Console and XLR dynamic microphones connected to a laptop. I still use the latter setup if there are more than two of us and/or I want to control the individual microphone levels. However, in the interests of simplicity, I now use a digital recorder connected to two dynamic microphones on desktop stands. Here’s the specific gear list:

You’ll probably also want a larger SD card (the recorder comes with a 2GB one), a mini-USB cable and power adaptor, and some spare AA batteries.

With this setup, you can just sit the recorder on the table, plug in the microphones, and sit one in front of yourself and one in front of your guest. I’m not going to go into every detail of the recorder but a few tips and tricks.

  • You may want to plug the recorder into power (using its mini-USB) if possible. It’s fairly battery hungry and doesn’t give a lot of warning when it’s about to go.
  • Make sure you have recording space left. (You may be noticing a theme here. It’s called personal experience.)
  • The Tascam input can be set to auto-level. In my experience it’s only somewhat effective but I still find it better to use it than to not use it. 
  • The two external microphones will record into different stereo channels, which offers another opportunity to balance the recording with a bit of manipulation in Audacity or your audio processing software of choice. You can split the stereo channels into separate mono tracks, process them individually, and then recombine into a single stereo track. 

 For recordings on the road.

While the above setup is relatively compact, it’s more than I really want to travel with most of the time. Furthermore, it requires that you be able to find a table in a relatively quiet area which is often far easier said than done at the conferences I attend. You can’t really use the Tascam as a handheld recorder with its internal mics. They’re just too sensitive and pickup the noise of you handling the recorder. 

Instead, I use my iPhone or iPad and plug in a handheld iRig microphone. There's a corresponding iOS application but there's no reason you couldn't use any other recording application; the microphone just plugs into a standard 3.5mm jack. One nice detail of the iRig is that it comes with a splitter built into the jack. This means that you can easily monitor the recording with headphones, which can be useful if you're dealing with intermittent background noise.

I then just hold the microphone and move it up close to whoever is speaking at the moment. This generally works quite well for the style of interview podcasts that I do. I then transfer the recording to my laptop using whatever mechanism the recording app provides—in the case of iRig, I send it up to a server with FTP, then download it. I then edit the recording using Audacity in the usual way.

The same company also makes a small microphone that plugs directly into the jack of an iPhone. I don’t find handling the iPhone like a microphone quite as natural as handling a cylindrical microphone—but this mic lives in my accessory bag so it’s always with me in case an opportunity to make a recording pops up.

Friday, March 08, 2013

Remote podcasting with Google+ Hangouts

My remote podcasting setup
In my previous post, I discussed some of the ways that I record podcasts, but didn't get to my current preferred setup for recording a podcast with a remote guest. The post was already pretty long and my current setup is admittedly a little involved.

Let me first describe my equipment setup. It may sound premium, but we're not actually talking about a lot of money here—well under $200 (excluding the laptop of course)—and you can likely do even better if you have the patience to comb through Ebay and Craigslist.
Now do the following to get all the hardware wired together properly.
  1. Plug the microphone into the #1 XLR input on mixer.
  2. Connect the USB connection from the mixer to the computer.
  3. Plug your headphones into the mixer's headphone jack
  4. Press the Tape/USB to Mix button
  5. Power on the mixer
  6. After twiddling with the #1 input level and gain controls and the master level, you should be able to hear yourself speaking into the microphone through the headphones. (Here's a YouTube video to get you started.)
 Now, go to your computer system's sound control. On the Mac, this is the logically named "Sound" within System Preferences. Choose the Output tab. You should see an option labeled USB Audio Codec. Select it. Now choose the Input tab and do the same thing.

If you go to your favorite noise making website or application, you should hear it in your headphones. You adjust the volume with the system volume control. Now both the microphone and your system's outputs are being mixed. You're ready to proceed for real.

Start Audacity. Set the microphone input to USB Audio Codec. (If you don't see this, quit Audacity fully and restart it. At least on the Mac, Audacity doesn't seem to dynamically add USB devices after the program has started.) If you start recording, you should see Audacity recording both your voice coming in through the microphone and any sound coming from your browser or other source.

Start a Hangout with your guest. You both need to belong to Google+ and have added each other to your circles. Go to Google+ Hangouts and start a hangout with your guest. If all goes according to plan, you should be able to see and hear each other. (They should be using a microphone and headphones—or a headset—or it sort of defeats the purpose of the whole high fidelity exercise that we're involved in.)

Do some sound checks. You control the master volume with the slider on the mixer. Audacity should show a strong signal without clipping. You control the relative volumes of local and remote with the level/gain dials and the computer volume control respectively. (For normal spoken voice, I find that I dial things up fairly high for the local microphone.)

You should also consider turning off the video. I've been told that you're less likely to run into glitches in the stream that way.

Thursday, March 07, 2013

How I podcast (Part 1)

I've gotten back into the swing of podcasting in the new year, primarily in a ~15 minute interview format. I find it's a great way to get a lot of interesting content out there. In some ways, it's easier than blogging (although the logistics involved in scheduling other people probably makes it somewhat of a wash effort-wise overall). In any case, it adds variety.

With the help of my UK colleague Richard Morrell, I've also upgraded some of my equipment and processes. I confess to paying less attention to detail than Richard shows, but I have upgraded my audio quality overall. It's still a learning process but I thought it worthwhile (for both myself and others) to document where I'm at so far.

For recordings in the office:

It's better to do things in-person when possible. It's both easier to get high quality sound and to have a natural-feeling conversation. I use a couple different types of kit depending on the circumstances.

When I'm recording a podcast in the office, I typically just use Audacity on a laptop, together with a USB microphone. (I have a MacBook Pro, but it really doesn't matter as Audacity also runs on Linux and Windows.) I generally use a Snowball Blue microphone, which is a cool retro-looking thing that always gets lots of comments. It's big though, so if I were doing a recording using my laptop on the road, I'd want something smaller. The Samson Go Mic is a good choice. In any case, it's really important to use some external microphone rather than the laptop's built-in mic. 

The best setup I've found is to sit next to (i.e. not across the table from) the person you are interviewing and set the microphone to the cardioid pattern, which is typically the #1 position. In general, I find the omnidirectional pattern (typically #3) picks up too much ambient noise for a top-quality podcast. 

Do a sound check and set the microphone volume within Audacity so that the microphone input is strong but not clipping. You'll also want to record some room noise for subsequent background noise removal. And you're off. (Note: Make sure that Audacity is set to use the proper input device; it won't use the external microphone automatically. It also seems as if you have to completely quit Audacity before plugging in the microphone for it to be recognized.)

The first thing I do when editing is go to Noise Removal under Effect, get a noise profile, and then apply noise removal to the entire recording. I think this capability was just introduced in version 2 and, in my experience, does a great job of removing ventilation and other consistent background noises. Of course, the quieter an environment you can find, the better.

The biggest challenge I have is interviewees who speak softly and/or who have trouble maintaining a constant distance and orientation to the microphone. In that case, a mixer like the one I discuss under remote recordings would probably help but I haven't personally tried this to date. 

At this point, I'm pretty comfortable with just monitoring the recording visually in Audacity. Alternatively, you could plug a headphone splitter into the PC's headphone jack and connect headphones for both yourself and your guest. However, this may make some guests feel less relaxed and I don't think it's generally that important so long as you have a relatively (acoustically) controlled environment.

For recordings on the road:

The above setup can also go on the road of course. However, when I'm at conferences and the like, I'm often in the position of having to grab someone and just interview them in some relatively quiet corner—in which case, I like to use an easier setup.

There are good digital recorders on the market. The Zoom H2N is a favorite of many.

However, I use my iPhone or iPad and plug in an iRig microphone. There's a corresponding iOS application but there's no reason you couldn't use any other recording application; the microphone just plugs into a standard 3.5mm jack. One nice detail of the iRig is that it comes with a splitter built into the jack. This means that you can easily monitor the recording with headphones, which can be useful if you're dealing with intermittent background noise.

I then just hold the microphone and move it up close to whoever is speaking at the moment. This generally works quite well for the style of interview podcasts that I do. I then transfer the recording to my laptop using whatever mechanism the recording app provides—in the case of iRig, I send it up to a server with FTP, then download it. I then edit the recording using audacity in the usual way.

Remote recordings:

This section remains something of a work in progress. The biggest challenge I find is balancing the desire for quality with the desire to keep things relatively simple for my guests.

It's certainly possible (with non-overlapping conversations) to record everything local at the endpoints and merge them in the edit process. One way to do this would be to have a Skype call and have all participants record using Call Recorder. But this only really works if it's a podcast with "regulars," rather than rotating guests. 

The following are some of the available options running roughly from least favored to most favored (at the moment). 

Most unfavored is anything that involves a cell phone on either end of the conversation. Cell phones are just really bad juju for any sort of webcast, interview, or whatever that doesn't involve talking to people who are out on the scene someplace. So just don't. Ditto for speakerphones. It's even best to not use cordless phones if they can be avoided. I have a cheap $15 corded phone with a handset that I use at home for any sort of broadcast or recording. Now, I realize more and more folks don't even have landlines these days. But, if they don't, I strongly recommend trying one of the other options here.

With that out of the way, one of the options is to just record a phone call. If you have a corded phone with handset, as described above, the easiest option is something like a Radio Shack Mini Recorder Control. It connects between the handset and the phone and outputs to a standard jack which can be plugged into a digital recorder with a line-in, smartphone, or other recording device. Not the highest fidelity option, but simple enough and workable so long as your guest is on a good connection.

Alternatively, you can call your guest's phone on Skype from your PC and record the call using the aforementioned Call Recorder. As you'll be using a microphone, the fidelity of your voice will be high, but your guest will still be telephone grade. Furthermore, I find Skype to be something of a mixed bag. I commonly get glitches because of dropped packets or latency problems while recording—requiring some re-takes during the interview. 

Of course, you can also call your guest using Skype on their PC and record with Call Recorder. They'll have to sign up for an account if they don't have one. And they should have a microphone and headphones (or a headset) on their end. (Some podcast producers will even mail microphones to upcoming guests who don't have them.) This is a pretty good solution, modulo the occasional Skype glitches mentioned above and the requirements for the guest.

However, my current remote recording setup of choice is Google+ Hangouts in combination with a USB mixer on my end. I'll be covering this in an upcoming post.

Monday, March 19, 2012

CastingWords for podcast transcriptions

With my recent podcasting ramp up, I decided that I wanted to add transcripts. Podcasts are all well and good--and a lot of folks genuinely like to consume interviews that way--but others would just as soon read. And, of course, there are search-ability advantages to a text version as well.
Now I wasn't about to do this myself. Transcribing takes a fair bit of time even for a fast touch typist with the right gear (which I am not and don't have). So, I asked and Googled around and decided to give an outfit called CastingWords a shot.
You can see the results here. I only did some very light editing--mostly for formatting in the blog post (changing some paragraph breaks and the like). All the technical language, even non-inutitive stuff like spelling "Basel" correctly, was handled flawlessly as was the random capitalization that afflicts so many IT industry terms like JBoss. To be sure, I gave them a well-edited and audible file to work with, but the results are nonetheless top-notch.
Pricing for 6-day turnaround was $1.50 per minute of podcast time. (My only--minor--beef with the service was that they took about 7 days. Not a big deal.)
The behind-the-scenes at CastingWords is quite interesting. They have a workflow that leverages Amazon's Mechanical Turk, splitting audio files into chunks and having them worked on by both transcribers and "editors." The idea is that there's a system of checks to ensure a quality finished product. (This also means that the cost is doubtless higher than if you were to just use Mechanical Turk on your own, but presumably you get a more consistent result. For my purposes, CastingWords' price is low enough that it's not worth spending much time to shave a few more cents.)